[ You are viewing an archive of the CozyNet blog. ]

Welcome to the CozyNet Blog!
How I use VIM to make websites

The site you see before your eyes was made in VIM, and quite easily too! I’m not using a static site generator because I think it’s easier to just get it done with VIM. Buuuut, I’m not using simply VIM alone; there are a few other things at work here.
As you may have already seen, I’ve been using PHP scripts to generate some of the content that you see here. Since these scripts are centralized to a directory outside of the CozyNet webroot, this makes it easier to apply smaller changes down the road without having to touch every HTML document.
Additionally, I make use of basic HTML documents as templates and combined that with the functionality of the Marvim VIM plugin. Marvim is pretty much a VIM macro storage and recall plugin, where you can save your macro or even a selection of text to recall for later.
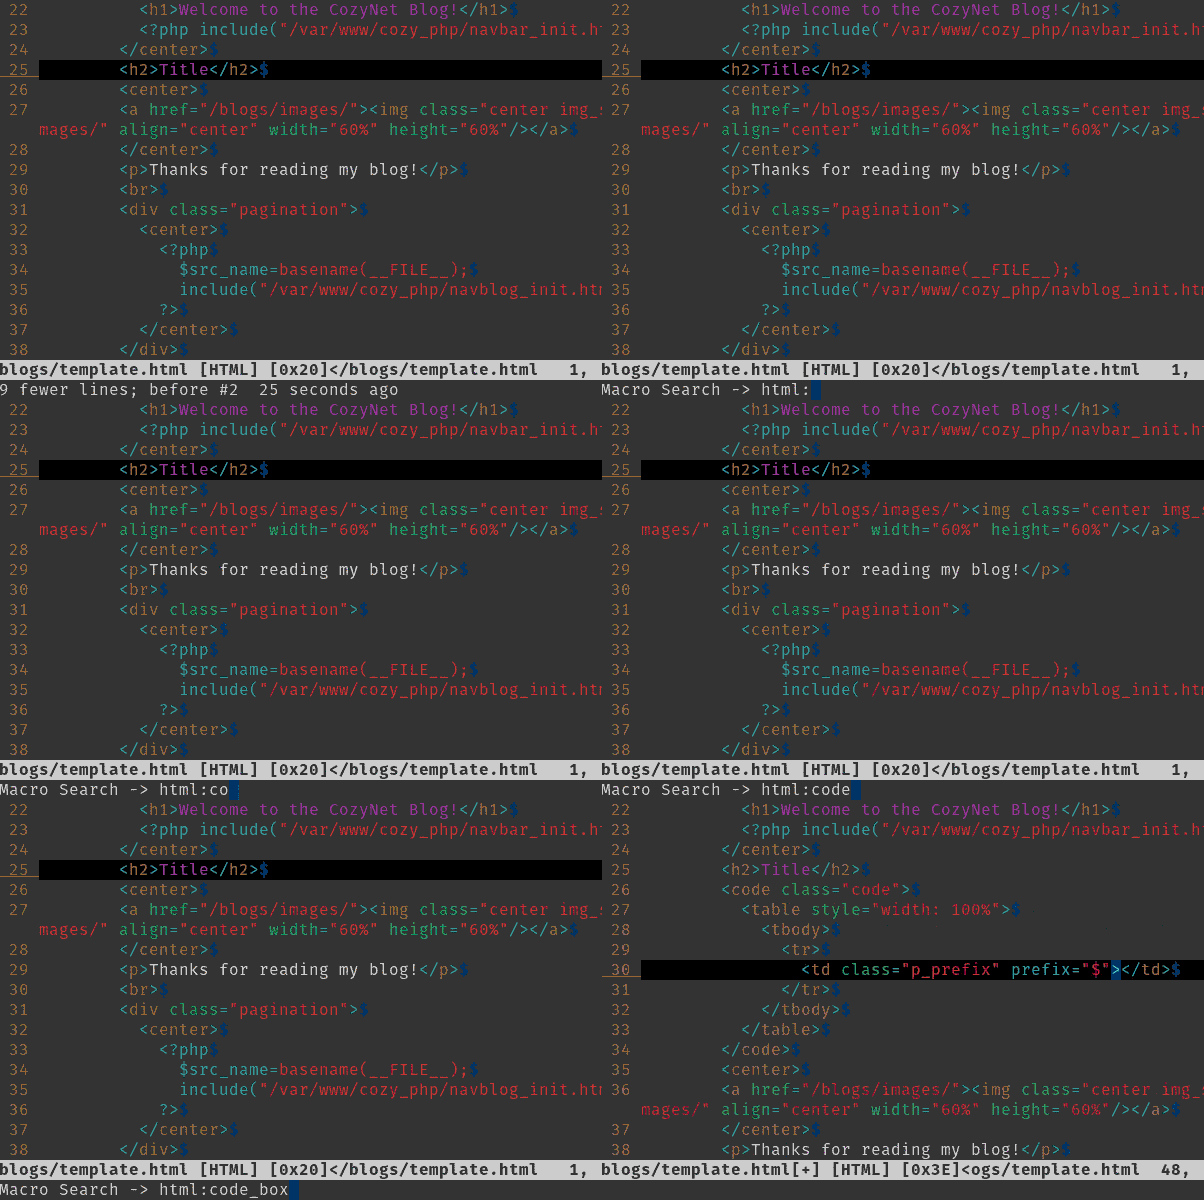
I wanted to demonstrate Marvim in a few scenarios so that you could get an idea of its functionality, especially with making web pages.
Let’s say that you want to slap down an image element in a document without having to type it all out manually. With Marvim, you can call up a saved example of this element with all the little bits and bobs.

Another scenario could include a table with a row and a few extra things.

As you can see, it saves on a lot of typing!
How to install
Step 1: Download the marvim.tar.gz file from this link. You’ll need to use the 0.4 version. The 0.5 Beta version is busted crap and won’t work, so don’t even bother with it!
Step 2: Extract the contents, tar xfv marvim.tar.gz.
Step 3: Create a “plugin” directory within your ~/.vim directory, mkdir -p ~/.vim/plugin.
Step 4: Copy the marvim.vim file into the ~/.vim/plugin directory.
Starting up VIM will cause the marvim plugin to auto-generate a ~/.marvim directory. Based on the file type from which you'll save a macro, it will create a corresponding directory for that file type that will contain the macro templates. So for example, if you’re editing an HTML file in VIM and decide to save a selection of text with marvim, it will store that selection in ~/.marvim/html.
How to use
I’m just going to repeat what’s on the VIM plugin site here. It’s pretty simple to use!
Store a new macro to the repository:
- Record the macro as usual into the q register (i.e. qq..<macro keystrokes>..q)
- Press the save macro key <F3> (default) in normal mode.
- Enter the macro name when prompted after the prefix (a prefix will be provided based on the filetype.)
- The macro is now store in the repository.
Save a template into the repository:
- In visual mode, select the area you want to save.
- Press the macro save button <F3> (default) while in visual mode.
- Enter a template name when prompted (a prefix will be provided based on the filetype).
- The template will be saved in the repository.
Recall a macro/template by searching:
- Pess the macro find key
(default) in normal mode. - Enter a search string when prompted (a prefix will be put by default, which can be modified)
- Press <Tab> or <Control-D> to auto-complete until you find the macro.
- Press enter to execute and load the macro for further use in the q register.
Replay the previously loaded macro on multiple lines for each line:
- While in visual mode, select the area you want the macro to run on.
- Press the macro find key <F3> (default) in visual mode.
- The macro in q register will be replayed for every line.
Conclusion
I am aware of other methods in editing web documents, but I still prefer VIM. Since I don’t intend to make any major overhauls to the site design, this has worked out pretty well and I suspect that some of you could also benefit from this approach.
You can register multiple macros to various keys to create a pretty fluent web editor out of VIM. As I’ve already said, combining this with PHP scripting and document templates goes hand in hand.
Thanks for reading my blog!
Date: 2023-02-25
Back to top!
Comments:
-
Mar 1, 2023
Permalink
Reply
 Blog
Blog Videos
 Music
Music Links
Links Contact
 About
About Homepage
 RSS feed
 Guestbook
 IRC
IRC