[ You are viewing an archive of the CozyNet blog. ]

Welcome to the CozyNet Blog!
 Blog
Blog Videos
 Music
Music Links
Links Contact
 About
About Homepage
 RSS feed
 Guestbook
 IRC
IRCConfiguring Dolphin file manager on KDE Plasma

I wantz a can of dolphin pwezzz!
I’ve been back on the KDE Plasma desktop for a few weeks now after my ventures with the Trinity Desktop Environment. I really want to use TDE, but it just isn’t working out. I think I said it once before, I think TDE works just fine on a dedicated Personal Computer, but it’s just not intended for laptops. It really falls apart when it comes to external displays, audio device management, and even networking. So long things are static, then it’s fine; it’s way too manual otherwise.
There are a few things I typically setup on my computers, regardless of distribution or desktop if possible, and I wanted share a few of those here today for KDE and the dolphin file manager.
- How to setup custom actions in Dolphin file manager
- Bypassing Dolphin kioslaves with GVFS fuse
- Easy access to iPhone pictures and files in Dolphin
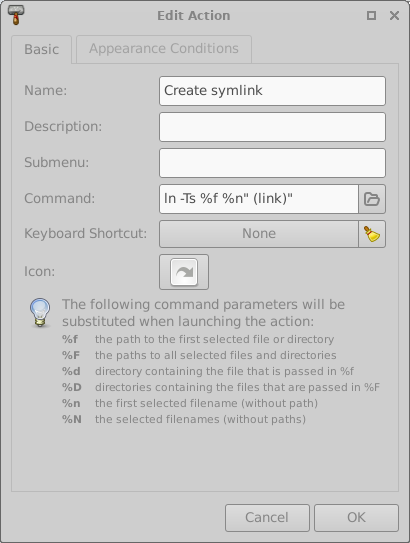
How to setup custom actions in Dolphin file manager:
Custom actions are a feature that’s kind of necessary, if not important for the way I work. If you don’t know what a custom action is, imagine being able to make your own right-click menu option that does something you specify when selecting a file or folder, or even multiple files and folders all at once in the file manager; an example scenario that comes to my mind would be an exif stripper that removes exif info on select files in the file manager form a simple context menu option. In my case, I use custom actions with a script that I made years ago for handling file transfers to multiple servers and image sharing direct-to-web from the file manager instead of ever needing a dedicated SFTP application. I might share this in in the future, but that’s outside this blog post for today.
Now unlike Thunar, Dolphin doesn’t provide an easy way to setup up custom actions. I had to search around the web until I came across some instructions on how to do this, so I’m going to show you here too! This is assuming that you already have a script of some sort that you can use as a custom action when highlighting files in the file manager.
First off, you’ll need to create the following directory path:
mkdir -p ~/.local/share/kservices5/ServiceMenus/
After that, move into the ServiceMenus directory and create a .desktop file; you can give it any name you want.
touch ~/.local/share/kservices5/ServiceMenus/exif_strip.desktop
Within the .desktop file, you’ll want something along the following lines:
[Desktop Entry]
Encoding=UTF-8
Actions=exif_strip;
X-KDE-ServiceTypes=KonqPopupMenu/Plugin
MimeType=image/jpeg;image/png;
Type=Service
X-KDE-Priority=TopLevel
[Desktop Action exif_strip]
Name=Exif info strip
Exec=exiftool -overwrite_original -all= %N
- MimeType: There are a few options available here. Let’s say that you want the custom action to show up only when selecting a specific file type. You can achieve this by changing it to the desired format. Now, you’re probably wondering, “how do I know what that looks like?” Well it’s pretty simple, you can use the “mimetype” command in your console against any file to get it’s “MimeType.”
For example, you can run the mimetype command against a JPG file and it’ll show you in the output.
                    mimetype cat_picture.jpg


                    cat_picture.jpg:  image/jpeg
You would then copy that into the MimeType option in the .desktop file. You can add additional mime types by separating them with a semi colon. If you want your custom action to apply to any and all files, then you can use “all/allfiles;” as the mime type too.
MimeType=image/jpeg;
For a more comprehensive explanation of options, you can read up on them on the freedesktop website.
- Exec: This is where you’ll pass the selected files or folders to your script from an exec key code. There are a few options here that are important to know. I recommend reading the options listed in the table on the freedesktop website.
In my example, I’m using the “%N” option which is considered deprecated but still works. “%N” will substitute the selected filenames without including their paths. It all depends on what you’re trying to achieve here, so you’ll might need a different option than me. After saving the .desktop file, quit out of Dolphin then re-open it and you should see the new custom action in your right-click context menu depending on the mimetype it’s configured for.
Note You can use the exec key code options as described in Thunar's example too.
Author update! (2024-04-15)
I recently discovered that Dolphin actions doesn’t quote the shell positionals, making it difficult to handle files and folders with spaces in the name. Thunar does quote the positionals however, so I came up with a quick hack to fix this with Dolphin. There are probably better methods of quoting these, but generally I prefer keeping everything in a one-shot method when dealing with tools like rsync instead of spawning multiple processes of rsync per each file. You can work the below script into your own custom action script for quoting each positional parameter.
while [ "$#" -ge 1 ]; do
selection=$(echo "$selection '$1'")
shift
done
echo "$selection"
Bypassing Dolphin kioslaves with GVFS fuse:
I’m not very fond of the kioslave service that Plasma implements for file mounting. I don’t believe it supports GVFS, which I find to be a necessity in mounting network file shares. Non-GVFS methods in network file mounting on *nix based devices in unstable situations has always been a trash fire that’s never been well addressed in my experience. Disruptions in network connectivity shouldn’t ever impact performance of the files system, and yet it does, and GVFS fuse has been the only solution that I’ve found to avoid that.
It does come with its downsides though, such as obfuscating the mount path, making it difficult for some desktop applications to function; for example, Libreoffice and it’s habit of generating lock files beside the original file. It doesn’t always play well in a GVFS mount. However, I haven’t run into this issue for quite awhile now so maybe it’s been improved?
I believe another issue I’ve come across in the past with GVFS mounts is the inability to execute applications from the file server, despite the SMB service on the server permitting execution. It’s hit or miss, so it’s up to your judgment. I just want to demonstrate my method in mounting a file share via GVFS fuse and accessing that mount point within Dolphin without ever involving the kioslave service.
I use Gigolo for GVFS, even in situations where the file manager might natively support the protocol. I find that it tends to do a much better job in auto-mounting and exposing the mount to the whole desktop thanks to fuse. There are a few additional packages required which for some reason aren’t included or even recommended by the Gigolgo package on Debian, yet they're important to have.
apt install gigolo gvfs-daemons gvfs-backends gvfs-fuse gvfs-common
You’ll need to reboot after the install is complete.
Next up, you’ll need to configure Gigolo to connect to your network file share, which is pretty straight forward; I’m assuming that you should already know how to do this, so I’m not going to walk you thru that part, however there are a few settings I recommend.
Open Gigolo, click “edit” in the menu bar > preferences > Interface tab. Check “Start minimized in the Notification area,” this way it doesn’t start up with a window when logging in. Remove the checked option for “Show auto-connect error messages,” so that you’re not bombarded with connection error popups.
You’ll also want to make sure that giglo starts up when logging in. You can do this by adding the following .desktop to your “~/.config/autostart” directory.
[Desktop Entry]
Encoding=UTF-8
Type=Application
Name=Gigolo
Comment=GVFS file mounter
Exec=gigolo
Once you have your network mount setup and connected in Gigolo, open Dolphin and navigate to the following directory:
/run/user/1000/gvfs/
You should see the mounted share from here. You can drag it over into the “Places” column in Dolphin, or bookmark it for quick access.
And that’s all there is to it! The next time you log back in, Gigolo should auto-mount the network share if it’s present, and you can simply click on your “Places” item or bookmark for it to access within Dolphin. No kioslave network setup needed!
Easy access to iPhone pictures and files in Dolphin:
By default, it seems Dolphin won’t show any indication that you’ve connected an iPhone. Instead, you’ll probably see a pop-up notification for a camera device, and clicking the option “open in file manager” does nothing. I don’t know if this is the case for other distributions, but it is for me being on Debian 12.
Alternatively, you can expand the options to reveal the “View photos with file manager,” and this seems to work. Only one problem is that if you close out of Dolphin, you have to go back through the device manager in the system tray to get back into your iPhone files.

To make this a little more simpler, right click in an empty space in the left sidebar of Dolphin that lists your Places, Remote networks, Recent files, and Devices. In the right click menu, select “Add Entry…”

From the “Add Places Entry” window, give it a label and adjust the location to “camera:/”. You can also give it a camera icon too. You can reposition the new Camera item in the sidebar by dragging and dropping it. Clicking it will take you to the “camera:/” location, and whenever you plug in your iPhone, it should show up as a selectable folder.

Thanks for reading my blog!
Date: 2024-04-02
Back to top!
Comments:
-
Jun 8, 2024
Permalink
Reply
-
Jun 1, 2024
Permalink
Reply
-
May 1, 2024
Permalink
Reply
-
Apr 25, 2024
Permalink
Reply